Synchronization Checklist
You will be presented with the synchronization checklist if you have enabled option Preview changes on Synchronize dialog. In the checklist you can select those synchronization actions you want to actually apply.
Advertisement
- Information Displayed
- Selecting Actions
- Reversing Action
- Resolving Renames
- Browsing Folders
- Custom Commands
Information Displayed
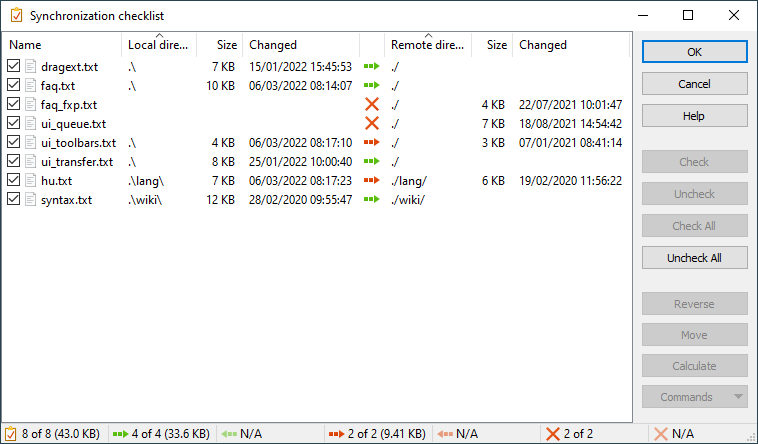
In the checklist, there is one row per each synchronization action. For each action, you can see the action type, visualized by icon.
- Green arrows indicate a new file that does not exist in the target/destination directory and will be copied to the directory that the arrow points to.1
- Red arrows indicate a changed file that will be copied to the directory (overwriting the file with the same name) that the arrow points to.1
- And finally red crosses indicate a file that only exists in the target/destination directory and will be deleted.1
For each action you can see also name of the file or directory (directories end with slash and can be distinguished also by an icon), and their attributes in either local or remote directory or both (for updated files). Columns Local/Remote directory indicate location of the files/directories relative to root directory of synchronization.
For directories, sizes are not shown initially. Sizes of checked directories are calculated once the dialog is submitted. You can calculate the sizes of selected directories in advance using Calculate button.
Selecting Actions
To select actions to be applied, use checkbox at the very beginning of each row. To check more actions at a time, select them and use buttons (Un)Check or context menu.
Advertisement
Note that you can select all actions of a certain type (like local file updates) by clicking on respective section of status bar (at the bottom of the window). To add the actions to the existing selection, hold down Ctrl key, while clicking.
You can also (un)check all actions in certain directory and its subdirectories by using command (Un)Check All Actions in This Directory from a context menu of any action from that directory.
Note that initially only those actions that you have requested by your synchronization options will be checked. I.e. if you have not enabled option Delete files, the deletion actions will be unchecked.
Reversing Action
You can reverse an action using Reverse button. Actions are reversed as follows:
- File update transfer ⇒ Reverse direction
- New file transfer ⇒ Delete file
- Delete file ⇒ New file transfer
Resolving Renames
When a file (or a directory) is renamed, synchronization sees it as an addition of one file and a deletion of another.
If you want to avoid potentially lengthy and useless re-transfer of the renamed file, you can make WinSCP rename the file in the target directory instead. Select the two actions that constitute the rename (a deletion and a new file transfer) and use command Move. Note that the file is renamed immediately, not only after the dialog is submitted.
Browsing Folders
Use Browse Local Directory or Browse Remote Directory in the action context menu to open the local or remote directories involved in the selected action.
The local directory opens in Windows File Explorer. The remote directory opens in a new WinSCP window. If you are using the Commander interface, WinSCP will open even the local directory in its local panel.
Custom Commands
Use Commands button to execute custom command over pair of files (local and remote). Selection of custom commands is limited to those executed both with local and remote files (“diff” commands). You have to select update action (blue arrow), i.e. where both local and remote file exists, to execute the custom command.
- If the box on the left is checked.Back