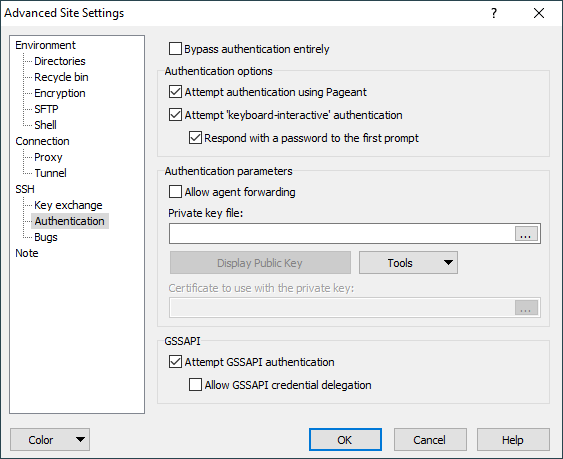
The Authentication Page (Advanced Site Settings dialog)
The Authentication page on the Advanced Site Settings dialog allows you to configure authentication options of SSH protocol.
Advertisement
To reveal this page you need to select SCP or SFTP file protocol on Login dialog.
Refer to documentation of page sections:
Bypassing Authentication
In SSH, it is in principle possible to establish a connection without using SSH’s mechanisms to identify or prove who you are to the server. Some servers may simply require no authentication whatsoever.
By default, WinSCP assumes the server requires authentication (we’ve never heard of one that doesn’t), and thus must start this process with a username. If you find you are getting username prompts that you cannot answer, you could try enabling Bypass authentication entirely. However, most SSH servers will reject this.
Advertisement
This is not the option you want if you have a username and just want WinSCP to remember it; It’s also probably not what if you’re trying to set up passwordless login to a mainstream SSH server; depending on the server, you probably wanted public-key authentication or perhaps GSSAPI authentication. (These are still forms of authentication, even if you don’t have to interact with them.)1
Authentication Options
Attempt Authentication Using Pageant
If this option is enabled, then WinSCP will look for Pageant and attempt to authenticate with any suitable public keys Pageant currently holds.
This behavior is almost always desirable, and is therefore enabled by default. In rare cases you might need to turn it off in order to force authentication by some non-public-key method such as passwords.1
Learn how to use the Pageant (PuTTY’s SSH authentication agent) application for public key authentication.
Attempt keyboard-interactive authentication
‘Keyboard-interactive’ is a flexible authentication method using an arbitrary sequence of requests and responses; so it is not only useful for challenge/response mechanisms such as S/Key, but it can also be used for (for example) asking the user for a new password when the old one has expired.1
WinSCP leaves this option enabled by default, but supplies a switch to turn it off in case you should have trouble with it. If your server uses keyboard-interactive authentication to ask for your password only, and you wish to allow WinSCP to reply with password entered on Login dialog, tick Respond with password to the first prompt.
Authentication Parameters
Allow agent forwarding
This option allows the SSH server to open forwarded connections back to your local copy of Pageant. If you are not running Pageant, this option will do nothing. Learn more about agent forwarding.
Private key file
Use the Private key file box to specify local path to your private key file if you are going to use public key authentication. The file must be in PuTTY format. If the private key is passphrase-protected, you will be prompted for passphrase once the authentication begins.
You can use Pageant so that you do not need to explicitly configure a key here.
If a private key file is specified here with Pageant running, WinSCP will first try asking Pageant to authenticate with that key, and ignore any other keys Pageant may have. If that fails, WinSCP will ask for a passphrase as normal. You can also specify a public key file in this case (in RFC 4716 or OpenSSH format), as that’s sufficient to identify the key to Pageant, but of course if Pageant isn’t present WinSCP can’t fall back to using this file itself.
Advertisement
The passphrase cannot be entered in advance in session settings and thus it cannot be saved to site. If you need to login to server automatically without prompt, generate a key without passphrase. Use this method carefully and only under special circumstances.
If you select a key file in a different format (OpenSSH or ssh.com), WinSCP will offer you to convert the key to PuTTY format. If certificate file with the same name2 is found, it will be automatically added to the converted key file.
Private Key Tools
Use the button Display Public Key to display public key in a format suitable for pasting into OpenSSH authorized_keys file.
The command Tools > Generate New Key Pair with PuTTYgen starts PuTTYgen, in which you can generate a new private key pair. After you save your new key pair in PuTTYgen, WinSCP will detect it and automatically insert a path to the new key file into Private key file box.
Use the command Tools > Install Public Key into Server to install a public key into OpenSSH server. You will be prompted to select key pair to install.3 You will need to authenticate to the server to install the key. You can authenticate using a password or using another key (select it in Private key file box). After installing succeeds, the new private key will be inserted into the Private key file box.
Certificate to use with the private key
In some environments, user authentication keys can be signed in turn by a certifying authority (CA for short), and user accounts on an SSH server can be configured to automatically trust any key that’s certified by the right signature. This is optional. If you don’t know you need it, you can leave this blank.
This can be a convenient setup if you have a very large number of servers. When you change your key pair, you might otherwise have to edit the authorized_keys file (in case of OpenSSH) on every server individually, to make them all accept the new key. But if instead you configure all those servers once to accept keys signed as yours by a CA, then when you change your public key, all you have to do is to get the new key certified by the same CA as before, and then all your servers will automatically accept it without needing individual reconfiguration.
One way to use a certificate is to incorporate it into your private key file. You can do that using PuTTYgen. But another approach is to tell WinSCP itself where to find the public certificate file, and then it will automatically present that certificate when authenticating with the corresponding private key.
To do this, enter the pathname of the certificate file into the Certificate to use with the private key file selector.
When this setting is configured, WinSCP will honour it no matter whether the private key is found in a file, or loaded into Pageant.1
GSSAPI
Attempt GSSAPI authentication
The GSSAPI authentication is a mechanism which delegates the authentication exchange to a library elsewhere on the client machine, which in principle can authenticate in many different ways but in practice is usually used with the Kerberos single sign-on protocol to implement passwordless login.
Advertisement
WinSCP supports two forms of GSSAPI-based authentication. In one of them, the SSH key exchange happens in the normal way, and GSSAPI is only involved in authenticating the user. The checkbox labelled Attempt GSSAPI authentication controls this form.
In the other method, GSSAPI-based authentication is combined with the SSH key exchange phase. If this succeeds, then the SSH authentication step has nothing left to do. See the Attempt GSSAPI key exchange checkbox on the Key exchange page.
If one or both of these controls is enabled, then GSSAPI authentication will be attempted in one form or the other, and (typically) if your client machine has valid Kerberos credentials loaded, then WinSCP should be able to authenticate automatically to servers that support Kerberos logins.
If both of those checkboxes are disabled, WinSCP will not try any form of GSSAPI at all, and the rest of the GSSAPI box is unused.
Allow GSSAPI credential delegation
GSSAPI credential delegation is a mechanism for passing on your Kerberos (or other) identity to the session on the SSH server. If you enable this option, then not only will WinSCP be able to log in automatically to a server that accepts your Kerberos credentials, but also you will be able to connect out from that server to other Kerberos-supporting services and use the same credentials just as automatically.
This option is the Kerberos analogue of SSH agent forwarding.
Note that, like SSH agent forwarding, there is a security implication in the use of this option: the administrator of the server you connect to, or anyone else who has cracked the administrator account on that server, could fake your identity when connecting to further Kerberos-supporting services. However, Kerberos sites are typically run by a central authority, so the administrator of one server is likely to already have access to the other services too; so this would typically be less of a risk than SSH agent forwarding.1
Further Reading
Read more about Login dialog and Advanced Site Settings dialog.
- The text is copy of PuTTY User Manual or was inspired by it.Back
- but
-cert.pubor.pub-aadcert.pubsuffixes.Back - You can also select public key file in OpenSSH
authorized_keysfile format.Back