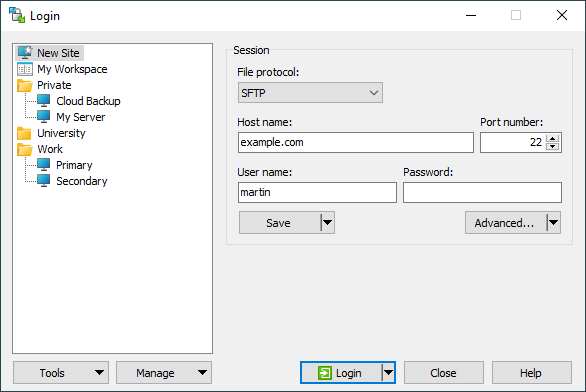
Configuring Session (Login Dialog)
To configure your session, start WinSCP, and then use the Login dialog that opens. It can be invoked also later to open additional sessions.
Login dialog also shows automatically on startup and when the last session is closed, by default. You can turn that off by unchecking the Show Login dialog on startup and when the last session is closed checkbox. You can revert that in preferences.
Advertisement
New Site
To connect to a new site, select New Site node in the tree on the left. Then select protocol, enter hostname and your username. Typically you will also need to enter your password. For details see below.
To start ad-hoc connection, click Login button.
Advertisement
If you plan to connect to the site often, you will want to save the site by clicking Save button.
You can base new site on existing one by using Manage > Clone to New Site command.
Session Settings
The File protocol selection lets you choose transfer protocol.
When FTP protocol is selected, you can further specify to use basic unsecured variant (No encryption) or one of methods to invoke FTPS. When WebDAV or S3 protocol is selected, you can choose between basic unsecured variant and secure one.1
The Hostname box is where you type the name, or the IP address, of the server you want to connect to. Hostname is the only mandatory box that must be filled for a session to open. You can use environment variables in the value with syntax %NAME%. If you enter a session URL here, it will be parsed.
The Port number box lets you specify which port number on the server to connect to. You need to specify it only in rare circumstances, when the server uses non standard protocol.2 Otherwise WinSCP selects the standard port number for you.
The Username box is where you type your account name on the server. If you do not fill the username, you will be prompted for username then.3 You can use environment variables in the value with syntax %NAME%. For Amazon S3, use Access key ID.
The Password box is for the password associated with the account. You are advised not to fill it in if you are going to save the site. If you decide to do so nevertheless, do not forget to force password storing on the Save session as dialog. Also do not fill the password if you are going to use other authentication method (like public key). If you do not fill the password and other authentication methods fail (password authentication has the lowest preference), you will be prompted for password then. For Amazon S3, use Secret access key.
With FTP protocol you can use Anonymous login. It effectively sets the Username to anonymous and Password to anonymous@example.com.
With S3 protocol you can use Credentials from AWS environment. The discovered credentials will show in the respective boxes, but they won’t be saved. They will be read again each time you login. The IAM role, AWS_ACCESS_KEY_ID, AWS_SECRET_ACCESS_KEY, AWS_SESSION_TOKEN, AWS_CONFIG_FILE, AWS_PROFILE and AWS_SHARED_CREDENTIALS_FILE environment variables and the profiles in the default .aws\credentials and .aws\config configuration files are used in the same order as AWS tools do. You can choose specific profile in combo box next to the checkbox.
If you need to configure advanced settings, click Advanced button to open Advanced Site Settings dialog. For settings not directly available in the interface and other special needs, use Advanced > Edit Raw Settings command to open Raw Site Settings dialog. For configuring transfer settings preset for the site, use Advanced > Transfer Settings Rule to open Transfer Settings Preset editor.
If there is a note associated with the site, it appears below Session box. To add or edit the site note go to Note page of Advanced Site Settings dialog.
Sites Sessions Management
The list on the left shows saved sites and workspaces. You should select from there a site, site folder, or workspace to work with before pressing one of the Login or Edit (sites only) buttons; or using Delete, Rename or other commands from the Manage menu button (also available from context menu).
Advertisement
Double-clicking a site or workspace opens it (as if you have clicked the Login button).
To open all sites in a site folder, select the folder and press the Login button.
If you have many sites, you can incrementally search for a site by typing part of its name. Then you can use Tab (or Shift-Tab) to search next (previous) matching sites. Press Esc to cancel searching. In the Incremental Search submenu of list context menu (or in Search panel context menu), you can select one of the search modes: Beginning of Site Name Only, Any Part of Site Name or All Major Site Fields (name, hostname, username and note).
Site Folders
The sites can be organized into folders. Expand/collapse folder by double-clicking on its name.
Use the Manage > New folder command to create new site folder. To create subfolder, use path syntax “folder/subfolder” (Select the parent folder before pressing button to have the path prefilled). Note that empty folders are not preserved.
Editing Existing Site
Use Edit button to start editing selected site. After you complete your changes, save them with Save button. You can also save a modified site under a new name using Save As command from drop-down menu of Save button.
Use Cancel button to rollback your changes.
Note that you cannot login to the site until you commit (or rollback) your changes.
If you want to change the same setting for many sites, you can use command-line parameter /batchsettings.
Deleting
The Manage > Delete command (or Del key) deletes selected site, site folder or workspace. Deleting a site folder deletes all the sites it contains.
Renaming
Use the Manage > Rename command to rename selected site, site folder or workspace.
Creating Shortcuts
Use Manage > Desktop Icon command to create a Desktop shortcut icons for selected site, site folder or workspace. For sites you can create also 'Send To’ shortcuts.
Note that if you delete the site the existing icons will not work anymore.
Renaming
Use the Manage > Rename command to rename selected site, site folder or workspace.
Advertisement
Advanced Functions
Opening Site in PuTTY
You can open configured session, the selected site or all sites in the selected folder in PuTTY SSH client instead of WinSCP. Use Manage > Open in PuTTY command.4
Opening sessions that require an SSH tunnel is not possible this way. You have to first open the session with the tunnel in WinSCP and only then open the session in PuTTY.
Default Session Settings
Use Manage > Set Defaults set configured session settings or settings of selected site as default session settings.
Pasting Session URL
Use the Manage > Paste Session URL or Ctrl+V to paste a session URL from the clipboard. It gets parsed into File protocol, Hostname, Username, etc. The command is available only for New Site node or when editing site.
Generating Session URL or Code
Use the Manage > Generate Session URL/Code to open Generate Session URL/Code dialog for selected site.
- With the S3 protocol, selecting the unsecure variant makes sense only, when connecting to 3rd party S3 server, as Amazon S3 does not support unsecure connections.Back
- SSH protocol uses port number 22 by default. FTP protocol uses port number 21 by default. FTPS protocol with implicit encryption uses port number 990 by default. WebDAV protocol uses port number 80 by default. Secure WebDAV and Amazon S3 use port 443.Back
- Except for special scenarios, such as authentication-less connection or GSSAPI authentication.Back
- Hold down
Shiftkey to open the site in PuTTY without closing WinSCP Login dialog.Back