This is an old revision of the document!
Using PuTTYgen
PuTTYgen is a key generator. It generates pairs of public and private keys to be used with WinSCP. PuTTYgen generates RSA and DSA keys.
- Obtaining and Starting PuTTYgen
- PuTTYgen Window
- Generating a New Key
- Selecting the Type of Key
- Selecting the Size (Strength) of the Key
- The Generate Button
- The Key Fingerprint Box
- Setting a Comment for Your Key
- Setting a Passphrase for Your Key
- Saving Your Private Key to a Disk File
- Saving Your Public Key to a Disk File
- Public Key for Pasting into authorized_keys File
- Reloading a Private Key
- Dealing with Private Keys in Other Formats
Advertisement
Obtaining and Starting PuTTYgen
PuTTYgen is included in the WinSCP installation package. You can also download it separately from the WinSCP download page.
PuTTYgen originates from PuTTY and is also part of the PuTTY installation package. It does not matter if you use PuTTYgen from WinSCP or the PuTTY installation package, they are identical.
To start PuTTYgen, go to Tools > PuTTYgen on Login dialog.
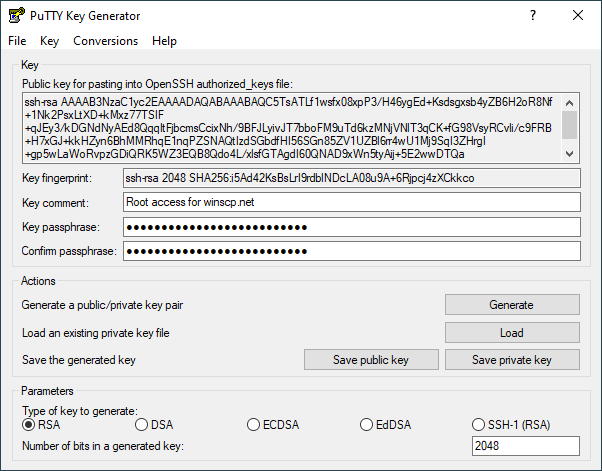
PuTTYgen Window
Advertisement
When you run PuTTYgen you will see a window where you have two choices: Generate, to generate a new public/private key pair, or Load to load in an existing private key.
Generating a New Key
This is a general outline of the procedure for generating a new key pair. The following sections describe the process in more detail.
- First, you need to select which type of key you want to generate, and also select the strength of the key.
- Then press the Generate button, to actually generate the key.
- Once you have generated the key, select a comment field and a passphrase.
- Now you’re ready to save the private key to disk; press the Save private key button.
Your key pair is now ready for use. You may also want to copy the public key to your server, either by copying it out of the Public key for pasting into authorized_keys file box, or by using the Save public key button. However, you don’t need to do this immediately; if you want, you can load the private key back into PuTTYgen later and the public key will be available for copying and pasting again.
For more details refer to guide to setting up public key authentication.
Selecting the Type of Key
Before generating a key pair using PuTTYgen, you need to select which type of key you need. PuTTYgen currently supports three types of key:
- An RSA key for use with the SSH-1 protocol.
- An RSA key for use with the SSH-2 protocol.
- A DSA key for use with the SSH-2 protocol.
The SSH-1 protocol only supports RSA keys; if you will be connecting using the SSH-1 protocol, you must select the first key type or your key will be completely useless.
The SSH-2 protocol supports more than one key type. The two types supported by WinSCP are RSA and DSA.
The WinSCP developers strongly recommend you use RSA. DSA has an intrinsic weakness which makes it very easy to create a signature which contains enough information to give away the private key! This would allow an attacker to pretend to be you for any number of future sessions. WinSCP’s implementation has taken very careful precautions to avoid this weakness, but we cannot be 100% certain we have managed it, and if you have the choice we strongly recommend using RSA keys instead.
If you really need to connect to an SSH server which only supports DSA, then you probably have no choice but to use DSA. If you do use DSA, we recommend you do not use the same key to authenticate with more than one server.
Selecting the Size (Strength) of the Key
The Number of bits input box allows you to choose the strength of the key PuTTYgen will generate.
Currently 2048 bits should be sufficient for most purposes.
Advertisement
The Key Fingerprint Box
The Key fingerprint box shows you a fingerprint value for the generated key. This is derived cryptographically from the public key value, so it doesn’t need to be kept secret.
The fingerprint value is intended to be cryptographically secure, in the sense that it is computationally infeasible for someone to invent a second key with the same fingerprint, or to find a key with a particular fingerprint.
Setting a Comment for Your Key
If you have more than one key and use them for different purposes, you don’t need to memorize the key fingerprints in order to tell them apart. PuTTYgen allows you to enter a comment for your key, which will be displayed whenever WinSCP or Pageant asks you for the passphrase.
The default comment format, if you don’t specify one, contains the key type and the date of generation, such as rsa-key-20011212. Another commonly used approach is to use your name and the name of the computer the key will be used on, such as simon@simons-pc.
To alter the key comment, just type your comment text into the Key comment box before saving the private key. If you want to change the comment later, you can load the private key back into PuTTYgen, change the comment, and save it again.
Setting a Passphrase for Your Key
The Key passphrase and Confirm passphrase boxes allow you to choose a passphrase for your key. The passphrase will be used to encrypt the key on disk, so you will not be able to use the key without first entering the passphrase.
When you save the key, PuTTYgen will check that the Key passphrase and Confirm passphrase boxes both contain exactly the same passphrase, and will refuse to save the key otherwise.
If you leave the passphrase fields blank, the key will be saved unencrypted. You should not do this without good reason; if you do, your private key file on disk will be all an attacker needs to gain access to any machine configured to accept that key. If you want to be able to passwordless log in without having to type a passphrase every time, you should consider using Pageant so that your decrypted key is only held in memory rather than on disk.
Advertisement
Under special circumstances you may genuinely need to use a key with no passphrase; for example, if you need to run an automated batch script that needs to make an SSH connection, you can’t be there to type the passphrase. In this case we recommend you generate a special key for each specific batch script (or whatever) that needs one, and on the server side you should arrange that each key is restricted so that it can only be used for that specific purpose. The documentation for your SSH server should explain how to do this (it will probably vary between servers).
Choosing a good passphrase is difficult. Just as you shouldn’t use a dictionary word as a password because it’s easy for an attacker to run through a whole dictionary, you should not use a song lyric, quotation or other well-known sentence as a passphrase. If you want your passphrase to make grammatical sense, this cuts down the possibilities a lot and you should use a longer one as a result.
Do not forget your passphrase. There is no way to recover it.
Saving Your Private Key to a Disk File
Once you have generated a key, set a comment field and set a passphrase, you are ready to save your private key to disk.
Press the Save private key button. PuTTYgen will put up a dialog box asking you where to save the file. Select a directory, type in a file name, and press Save.
This file is in PuTTY’s native format (*.PPK); it is the one you will need to tell WinSCP to use for authentication.
Saving Your Public Key to a Disk File
RFC 4716 specifies a standard format for storing SSH-2 public keys on disk. Some SSH servers (such as ssh.com’s) require a public key in this format in order to accept authentication with the corresponding private key. (Others, such as OpenSSH, use a different format)
To save your public key in the SSH-2 standard format, press the Save public key button in PuTTYgen. PuTTYgen will put up a dialog box asking you where to save the file. Select a directory, type in a file name, and press Save.
You will then probably want to copy the public key file to your SSH server machine.
If you use this option with an SSH-1 key, the file PuTTYgen saves will contain exactly the same text that appears in the Public key for pasting box. This is the only existing standard for SSH-1 public keys.
Reloading a Private Key
PuTTYgen allows you to load an existing private key file into memory. If you do this, you can then change the passphrase and comment before saving it again; you can also make extra copies of the public key.
Advertisement
To load an existing key, press the Load button. PuTTYgen will put up a dialog box where you can browse around the file system and find your key file. Once you select the file, PuTTYgen will ask you for a passphrase (if necessary) and will then display the key details in the same way as if it had just generated the key.
If you use the Load command to load a foreign key format, it will work, but you will see a message box warning you that the key you have loaded is not a PuTTY native key. See below for information about importing foreign key formats.
Dealing with Private Keys in Other Formats
Most SSH-1 clients use a standard format for storing private keys on disk. WinSCP uses this format as well; so if you have generated an SSH-1 private key using OpenSSH or ssh.com’s client, you can use it with WinSCP, and vice versa.
However, SSH-2 private keys have no standard format. OpenSSH and ssh.com have different formats, and WinSCP’s is different again. So a key generated with one client cannot immediately be used with another.
Using the Import command from the Conversions menu, PuTTYgen can load SSH-2 private keys in OpenSSH’s format and ssh.com’s format. Once you have loaded one of these key types, you can then save it back out as a PuTTY-format key (*.PPK) so that you can use it with the WinSCP. The passphrase will be unchanged by this process (unless you deliberately change it). You may want to change the key comment before you save the key, since OpenSSH’s SSH-2 key format contains no space for a comment and ssh.com’s default comment format is long and verbose.
PuTTYgen can also export private keys in OpenSSH format and in ssh.com format. To do so, select one of the Export options from the Conversions menu. Exporting a key works exactly like saving it - you need to have typed your passphrase in beforehand, and you will be warned if you are about to save a key without a passphrase.
Note that since only SSH-2 keys come in different formats, the export options are not available if you have generated an SSH-1 key.1
- The text is copy of PuTTY User Manual or was inspired by it.Back