Connecting securely to Amazon EC2 server with SFTP
With WinSCP you can easily upload and manage files on your Amazon EC2 (Elastic Compute Cloud) instance/server over SFTP protocol.
- Direct Connection
- Connecting to EC2 instance in VPC
- Connecting using AWS SSM (Session Manager)
- Further reading
Direct Connection
Before starting you should:
- Have WinSCP installed;
- Have Amazon EC2 instance running;
- Have enabled inbound SSH traffic from your IP address to your instance;
- Have your key pair ready;
Advertisement
Collect information about your EC2 instance:
- Host name: Check Public DNS column on Instances page of Amazon EC2 console. Note that the public DNS may change when instance is restarted.
- Host key fingerprint: On the first connect you will be prompted to verify server host key.
- To securely acquire a fingerprint of the host key, use EC2 web-based terminal. Go to Actions > Connect > EC2 Instance Connect > Connect on Instances page of Amazon EC2 console. In the terminal, use
ssh-keygencommand to display a fingerprint of any number of host keys algorithms. The following example shows SHA-256 and MD5 fingerprints of Ed25519 hostkey:
sudo ssh-keygen -l -f /etc/ssh/ssh_host_ed25519_key
sudo ssh-keygen -l -f /etc/ssh/ssh_host_ed25519_key -E md5
- To securely acquire a fingerprint of the host key, use EC2 web-based terminal. Go to Actions > Connect > EC2 Instance Connect > Connect on Instances page of Amazon EC2 console. In the terminal, use
Advertisement
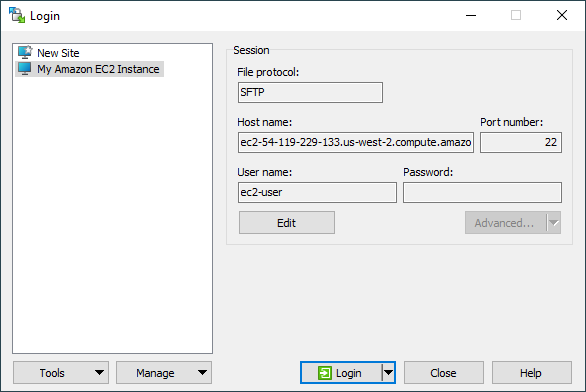
Start WinSCP. Login dialog will appear. On the dialog:
- Make sure New site node is selected.
- On New site node, make sure SFTP protocol is selected.
- Enter your EC2 instance public DSN name (see above) into Host name box.
- User name differs with instance type:
- For an Amazon Linux AMI, the user name is
ec2-user. - For a RHEL5 AMI, the user name is either
rootorec2-user. - For an Ubuntu AMI, the user name is
ubuntu. - For an Centos AMI, the user name is
centos. - For a Fedora AMI, the user name is either
fedoraorec2-user. - For SUSE Linux, the user name is
rootorec2-user.
- For an Amazon Linux AMI, the user name is
- Press Advanced button to open Advanced site settings dialog and go to SSH > Authentication page.
- In Private key file box select the
.pemprivate key file. WinSCP will need to convert the key to its.ppkformat (you can then use the converted.ppkkey for example with PuTTY SSH client). - Submit Advanced site settings dialog with OK button.
- Save your site settings using Save button.

- Login using Login button.
- Verify the host key by comparing fingerprints with those collected before (see above).
If you are managing a large amount of servers, and it is not feasible for you to save a site for each of them in WinSCP, consider using the user script Injecting SFTP or FTP URL to a page (Amazon EC2 management console).
Connecting to EC2 instance in VPC
To connect to an EC2 instance in an Amazon VPC, you can tunnel through a NAT instance.
For details, see Connect to FTP/SFTP server which can be accessed via another server only.
Connecting using AWS SSM (Session Manager)
In Host name, specify your Instance ID.
Press Advanced button to open Advanced site settings dialog and go to Connection > Proxy page. There:
- For Proxy type, select Local.
- In Local proxy command, specify:
aws ssm start-session --target %host --document-name AWS-StartSSHSession --parameters "portNumber=%port" --profile <aws profile> --region <region>
- You may need to set Do DNS name lookup at proxy end to Yes.
Further reading
- Upload files to FTP server or SFTP server;
- Automate file transfers (or synchronization) to FTP server or SFTP server;
- How do I change user after login (e.g. su root)?
- Official AWS guide for connecting using PuTTY/WinSCP;
- Official AWS guide for transfering files using a WinSCP
- Connecting securely to Google Compute Engine server with SFTP;
- Connecting securely to Microsoft Azure service with SFTP or FTPS.
Advertisement