This is an old revision of the document!
Connecting Securely to Amazon EC2 Server with SFTP
With WinSCP you can easily upload and manage files on your Amazon EC2 (Elastic Compute Cloud) instance/server over SFTP protocol.
Before starting you should:
- Have WinSCP installed;
- Have Amazon EC2 instance running;
- Have enabled inbound SSH traffic from your IP address to your instance;
- Have your key pair ready;
Advertisement
First you need to convert your private key from .pem format to .ppk:
- Use PuTTYgen tool for conversion;
- PuTTYgen installs by default with WinSCP. One way to run it is using Tools > Run PuTTYgen command on WinSCP Login dialog.
- In PuTTYgen window, use Conversions > Import command and locate your private key in
.pemformat. - Optionally enter passphrase for the converted key to protect it.
- Save private key to
.ppkformat using Save private key button.
Collect information about your EC2 instance:
- Host name: Check Public DNS column on Instances page of Amazon EC2 console. Note that the public DNS may change when instance is restarted.
- Host key fingerprint: On the first connect you will be prompted to verify server host key.
- You can locate key fingerprint in server’s initial start log, when host keys are generated.1 Use Actions > Get System Log command on Instances page of Amazon EC2 console:

Alternatively useec2-get-console-outputcommand-line tool.
Look for RSA (or DSA) key fingerprint. WinSCP does not support ECDSA keys. - If you did not save the fingerprint on the first instance run, but you have another EC2 instance that you can connect to safely (you know its fingerprints), you can connect to the target instance using private IP from the trusted instance. Staying within private Amazon network keeps you safe from man-in-the-middle attacks. When on the trusted instance terminal, you can use following commands to collect fingerprints:
$ ssh-keyscan <target_instance_private_ip> > ec2key
$ ssh-keygen -l -f ec2key
2048 cc:3d:ac:a7:13:61:4c:14:25:47:80:ae:f1:f3:aa:10 172.31.30.101 (RSA)
256 ea:bc:4d:5f:ae:00:48:75:45:ba:97:43:fe:e1:a3:e9 172.31.30.101 (ECDSA)
- If you do not have another trusted instance, you can create new temporary instance, just for the purpose of collecting the keys. First find keys for the new temporary instance, using it’s initial start log. Then collect keys of the target instance by connecting to it from the temporary instance. After that you can discard the temporary instance.
- You can locate key fingerprint in server’s initial start log, when host keys are generated.1 Use Actions > Get System Log command on Instances page of Amazon EC2 console:

Advertisement
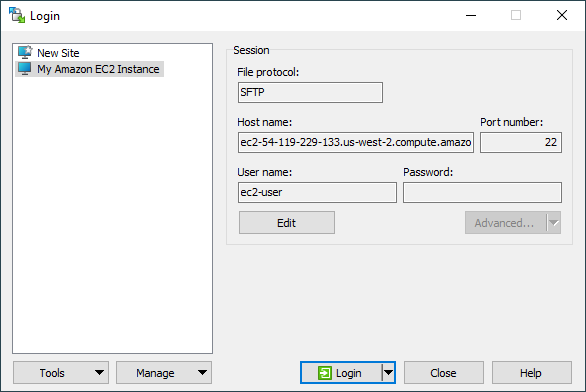
Start WinSCP. Login dialog will appear. On the dialog:
- Make sure New site node is selected.
- On New site node, make sure SFTP protocol is selected.
- Enter your EC2 instance public DSN name (see above) into Host name box.
- User name differs with instance type:
- For an Amazon Linux AMI, the user name is
ec2-user. - For a RHEL5 AMI, the user name is either root or
ec2-user. - For an Ubuntu AMI, the user name is
ubuntu. - For a Fedora AMI, the user name is either
fedoraorec2-user. - For SUSE Linux, the user name is
root.
- For an Amazon Linux AMI, the user name is
- Press Advanced button to open Advanced site settings dialog and go to SSH > Authentication page.
- In Private key file box select file you have saved your private key in
.ppkformat. - Submit Advanced site settings dialog with OK button.
- Save your site settings using Save button.

- Login using Login button.
- Verify the host key by comparing fingerprints with those collected before (see above).
Further reading
- Guide to uploading files to SFTP server;
- Guide to automating operations (including upload);
- How do I change user after login (e.g. su root)?
- Official guide for connecting using PuTTY/WinSCP;
- Guide to connecting to Google Compute Engine server with SFTP;
- Guide to connecting to Microsoft Azure Service with SFTP or FTPS.
- Using
cloud-initscript.Back