This is an old revision of the document!
Connecting Securely to Google Compute Engine Server with SFTP
With WinSCP you can easily upload and manage files on your Google Compute Engine (GCE) instance/server over SFTP protocol.
Before starting you should:
Advertisement
First you need to generate your private key, if you do not have one yet:
- Use PuTTYgen tool to generate new key.
- PuTTYgen installs by default with WinSCP. One way, to run it, is using Tools > Run PuTTYgen command on WinSCP Login dialog.
Collect information about your GCE instance:
- IP address: Check External IP column on Compute > Compute Engine > VM Instances page of your project on Google Developers Console.
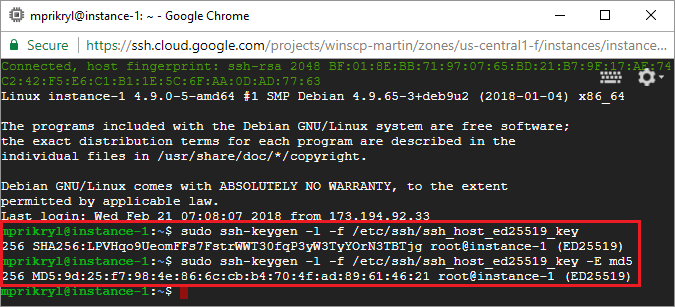
- Host key fingerprint: On the first connect you will be prompted to verify a server host key.
- To securely acquire a fingerprint of the host key, use web-based SSH client in Google Developers Console (use SSH link on the VM Instances page). You will see the fingerprint as soon as you connect. To see the host key for other algorithms use following commands:
ssh-keygen -l -f /etc/ssh/ssh_host_rsa_key
ssh-keygen -l -f /etc/ssh/ssh_host_dsa_key

- To securely acquire a fingerprint of the host key, use web-based SSH client in Google Developers Console (use SSH link on the VM Instances page). You will see the fingerprint as soon as you connect. To see the host key for other algorithms use following commands:
Set up SSH keys for your Google Compute account:
- Load your private key to PuTTYgen;
- Enter your GCE username1 to Key comment box.
- Copy a contents of Public key for pasting to OpenSSH authorized_keys file to the clipboard (note that the contents includes your username);
- Go to Compute > Compute Engine > Metadata page of your project on Google Developers Console;
- Go to SSH Keys tab and click Edit;
- Paste contents of the clipboard to Enter entire key data box (note how the username is automatically recognized).
- Press Done and wait for the key to be saved.
If you want to set up the keys for a specific instance only, use Add SSH key link on the instance page instead of using project’s Metadata page.
Finally, start WinSCP. Login dialog will appear. On the dialog:
- Make sure New site node is selected.
- On the New site node, make sure SFTP protocol is selected.
- Enter your GCE instance public IP address (see above) into the Host name box.
- Enter your GCE username into the User name box;
- Press Advanced button to open Advanced site settings dialog and go to SSH > Authentication page.
- In the Private key file box select your private key file.
- Submit the Advanced site settings dialog with OK button.
- Save your site settings using the Save button.
- Login using the Login button.
- Verify the host key by comparing fingerprints with those collected before (see above).
Advertisement
Further reading
- Guide to uploading files to SFTP server;
- Guide to automating operations (including upload);
- How do I change user after login (e.g. su root)?
- Guide to connecting to Amazon EC2 Server with SFTP.
- If you do not know your username, it’s typically your Google account email address with all symbols replaced with underscore, i.e. username for
martin@example.comismartin_example_com.Back