This is an old revision of the document!
Connecting Securely to Microsoft Azure Service with SFTP or FTPS
With WinSCP you can easily upload and manage files on your Microsoft Azure instance/service over SFTP protocol or FTPS protocol.
- Before Starting
- Connecting to a Linux Virtual Machine with SFTP
- Connecting to a Windows Virtual Machine with FTPS
- Connecting to a Web Site with FTPS
- Further reading
Advertisement
Before Starting
Before starting you should have WinSCP installed.
Connecting to a Linux Virtual Machine with SFTP
First, collect information about your virtual machine instance, on the Azure portal:
- Host name:
- Use IP address you find in the Public IP address section on your virtual machine instance page ;
- Or setup a DNS name for the virtual machine by clicking on the Configure link in DNS name section. A Configuration panel opens. There, in the DNS name label, enter a sub domain for your virtual machine. Click Save button. A full hostname now appears in the DNS name section in a format
subdomain.location.cloudapp.azure.com.
- Username: Use the username, that you created, when creating the virtual machine.
- Host key fingerprint: On the first connect you will be prompted to verify server host key.
- You can locate key fingerprint in server’s initial start log, when host keys are generated.1 Go to the Boot diagnostics page, switch to Serial log tab and its and search for
-----BEGIN SSH HOST KEY KEYS-----:
-----BEGIN SSH HOST KEY KEYS-----
ecdsa-sha2-nistp256 AAAAE2VjZHNhLXNoYTItbmlzdHAyNTYAAAAIbmlzdHAyNTYAAABBBOXBTK0rhHsOnu93hq/YsVBseEvu56WPkCwleBJb4QthaJ7j6Ih4O3dNJHkJ6xv8BxjeTNDoEnwOqJwHXbbmGWw= root@ubuntu
ssh-ed25519 AAAAC3NzaC1lZDI1NTE5AAAAICv8CYlgCghyr1q+XdGJB560N9FuF4JY4ALHfkR/mktm root@ubuntu
ssh-rsa AAAAB3NzaC1yc2EAAAADAQABAAABAQCqn2SnEPSysG2n/v3lzSTH/7GwpwhxIyRfp0wYRDu1cIizjyiD7m8GQI2R2OqBGnole/s5c1BkP9/QOTtLGZQVta5kCT8t6Ph7soe7ST8Ee7ok45648zEeKqf4tGfyFTlSJOtNWEh9qAlx79pL7rxC6QphWqYNFDPuTjPigwGsVhznTWry8OJZnJuSQCM07UDP+995yrJLqjZxY6StOMELILamcYO6XdoQvF/a1byVTQnbKO6Mdt8V+J+RY8ibNeYdAjfO1dQuUZIHwf8HiS5nD1+IzeiEH4V6Hr7uDCR+1V6rRj93x/NvPgM6T99urb5Br+GYZ4wVkAsZOTg3OFTT root@ubuntu
-----END SSH HOST KEY KEYS-----
Alternatively useGet-AzureRmVMBootDiagnosticsDatacommand.
Look for Ed25519 key. The logged fingerprint of the key uses Base64-encoded SHA-256 hash of the key. While WinSCP uses hexadecimal-encoded MD5 hash of the key. To calculate the fingerprint in WinSCP format, execute this command in Windows PowerShell (after inserting thessh-ed25519key):
Write-Host ([BitConverter]::ToString([Security.Cryptography.MD5]::Create().ComputeHash([Convert]::FromBase64String("AAAAC3NzaC1lZDI1NTE5AAAAICv8CYlgCghyr1q+XdGJB560N9FuF4JY4ALHfkR/mktm"))) -replace "-", ":").ToLower()
- If you did not save the fingerprint on the first virtual machine, but you have another Azure virtual machine that you can connect to safely (you know its fingerprints), you can connect to the target instance using private IP from the trusted instance. Staying within a private Azure network keeps you safe from man-in-the-middle attacks. When on the trusted instance terminal, you can use the following commands to collect fingerprints:
$ ssh-keyscan <target_instance_private_ip> > azurekey
$ ssh-keygen -l -f azurekey -E md5
2048 MD5:51:3b:ea:96:3d:3c:80:25:ae:b1:9c:a8:4c:76:82:09 <private_ip> (RSA)
256 MD5:e5:27:88:a8:bc:f0:64:bb:3a:e7:71:e6:4d:a1:40:ed <private_ip> (ECDSA)
256 MD5:cf:35:d4:78:43:48:26:bf:dc:96:f4:63:8e:ee:35:5b <private_ip> (ED25519)
- If you do not have another trusted instance, you can create new temporary instance, just for the purpose of collecting the keys. First find keys for the new temporary instance, using its initial start log. Then collect keys of the target instance by connecting to it from the temporary instance. After that you can discard the temporary instance.
- You can locate key fingerprint in server’s initial start log, when host keys are generated.1 Go to the Boot diagnostics page, switch to Serial log tab and its and search for
- When creating new virtual machine, consider setting up public key authentication by pasting your public key to SSH public key box of the Configure basic settings steps. If you want to setup public key authentication later, you have to set it up manually.
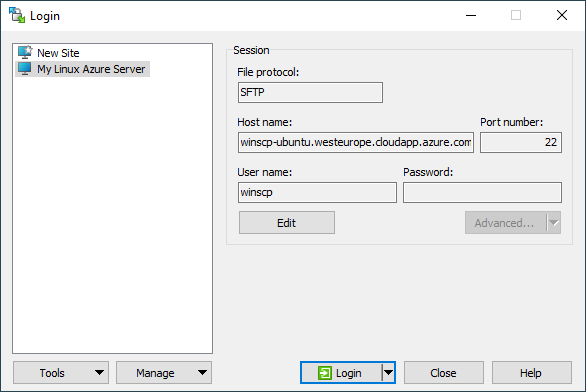
To connect to a virtual machine instance with SFTP, start WinSCP. Login dialog will appear. On the dialog:
- Make sure New site node is selected.
- On the New site node, make sure SFTP protocol is selected.
- Enter Host name.
- Enter User name.
- Enter a password for the username. Or specify a private key, if you set up a public key authentication..
- Save your site settings using the Save button.
- Login using the Login button.
- Verify the host key by comparing fingerprints with those collected before (see above).
Advertisement
Connecting to a Windows Virtual Machine with FTPS
First you need to install a FTPS server on the virtual machine.
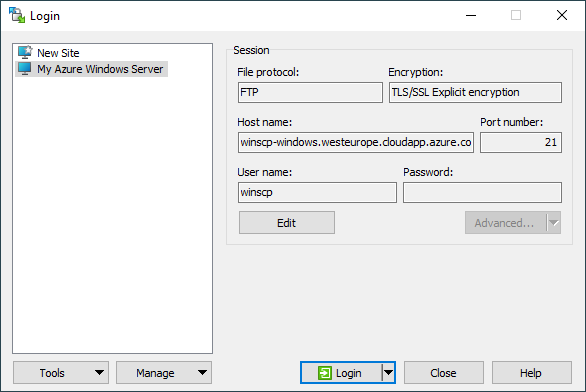
To connect to the virtual machine with FTPS, start WinSCP. Login dialog will appear. On the dialog:
- Make sure New site node is selected.
- On the New site node, select FTP protocol and TLS/SSL Explicit encryption.
- In Host name box enter an address of your virtual machine:
- Use IP address you find in the Public IP address section on your virtual machine instance page on the Azure portal.
- Or setup a DNS name for the virtual machine by clicking on the Configure link in DNS name section. A Configuration panel opens. There, in the DNS name label, enter a sub domain for your virtual machine. Click Save button. A full hostname now appears in the DNS name section in a format
subdomain.location.cloudapp.azure.com.
- Enter username and password of an account you want to connect with. Use the account you have specified when creating the instance or any other account you have created on the instance.
- Save your site settings using the Save button.
- Login using the Login button.
- If you are using self-signed certificate, you will be prompted to accept it.
Advertisement
Connecting to a Web Site with FTPS
First, collect information about your web site, on the Azure portal:
- Host name: Copy host name from FTPS hostname section on the Essentials panel.
- User Name: Copy username from the FTP/deployment username section on the Essentials panel. If you did not set up an FTP account yet, use Deployment credentials page. User name has a form
name\user. You need to use both parts when authenticating.
To connect to the web site with FTPS, start WinSCP. Login dialog will appear. On the dialog:
- Make sure New site node is selected.
- On the New site node, select FTP protocol and TLS/SSL Explicit encryption.
- In Host name box paste a host name of your instance in format
waws-prod-xxx-xxx.ftp.azurewebsites.windows.net. You can also paste a complete URL to select protocol, encryption and insert host name at once. - Enter the User name and the Password.
- Save your site settings using the Save button.
- Login using the Login button.
- Web site TLS/SSL certificate is signed by a trusted authority, so you won’t be prompted to verify it.

Automating Access to the WebSite
See example for automating update of a WebJob on the WebSite.
Further reading
- Guide to uploading files to SFTP/FTPS server;
- Guide to automating operations (including upload);
- Guide to connecting to Amazon EC2 server with SFTP;
- Guide to connecting to Google Compute Engine server with SFTP.
Advertisement
- Using
cloud-initscript.Back