Using PuTTYgen
PuTTYgen is a key generator. It generates pairs of public and private keys to be used with WinSCP. PuTTYgen generates RSA, DSA, ECDSA, and EdDSA keys.1
Advertisement
- Obtaining and Starting PuTTYgen
- PuTTYgen Window
- Generating a New Key
- Selecting the Type of Key
- Selecting the Size (Strength) of the Key
- Selecting the Prime Generation Method
- The Generate Button
- The Key Fingerprint Box
- Setting a Comment for Your Key
- Setting a Passphrase for Your Key
- Adding a Certificate to Your Key
- Saving Your Private Key to a Disk File
- Saving Your Public Key to a Disk File
- Public Key for Pasting into OpenSSH authorized_keys File
- Parameters for Saving Key Files
- Reloading a Private Key
- Dealing with Private Keys in Other Formats
- PuTTYgen Command-line Configuration
Advertisement
Obtaining and Starting PuTTYgen
PuTTYgen is included in the WinSCP installation package. You can also download it separately from the WinSCP download page.
PuTTYgen originates from PuTTY and is also part of the PuTTY installation package. It does not matter if you use PuTTYgen from WinSCP or the PuTTY installation package, they are identical.
To start PuTTYgen, go to Tools > PuTTYgen on Login dialog.
PuTTYgen Window
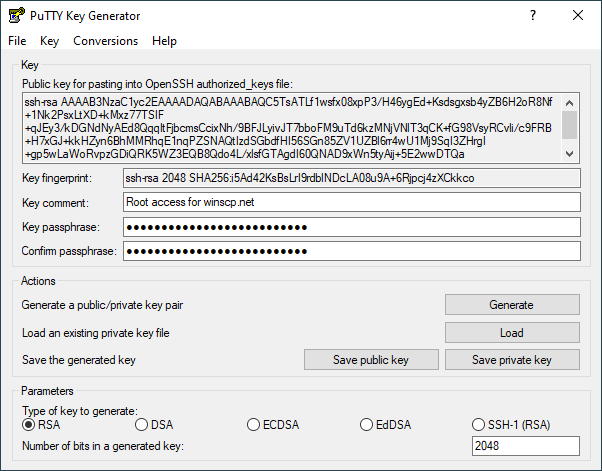
When you run PuTTYgen you will see a window where you have two main choices: Generate, to generate a new public/private key pair, or Load to load in an existing private key.
Generating a New Key
This is a general outline of the procedure for generating a new key pair. The following sections describe the process in more detail.
- First, you need to select which type of key you want to generate, and also select the strength of the key.
- Then press the Generate button, to actually generate the key.
- Once you have generated the key, select a comment field and a passphrase.
- Now you’re ready to save the private key to disk; press the Save private key button.
Your key pair is now ready for use. You may also want to copy the public key to your server, either by copying it out of the Public key for pasting into OpenSSH authorized_keys file box, or by using the Save public key button. However, you don’t need to do this immediately; if you want, you can load the private key back into PuTTYgen later and the public key will be available for copying and pasting again.
Advertisement
For more details refer to guide to setting up public key authentication.
Selecting the Type of Key
Before generating a key pair using PuTTYgen, you need to select which type of key you need.
The SSH protocol supports several different key types, although specific servers may not support all of them. PuTTYgen can generate:
- An RSA key.
- A DSA key.
- An ECDSA (elliptic curve DSA) key.
- An EdDSA key (Edwards-curve DSA, another elliptic curve algorithm).
PuTTYgen can also generate an RSA key suitable for use with the deprecated SSH-1 protocol (which only supports RSA). But SSH-1 is no longer supported by WinSCP.
Selecting the Size (Strength) of the Key
The Number of bits input box allows you to choose the strength of the key PuTTYgen will generate.
- For RSA and DSA, 2048 bits should currently be sufficient for most purposes. (Smaller keys of these types are no longer considered secure, and PuTTYgen will warn if you try to generate them.)
- For ECDSA, only 256, 384, and 521 bits are supported, corresponding to NIST-standardised elliptic curves. (Elliptic-curve keys do not need as many bits as RSA keys for equivalent security, so these numbers are smaller than the RSA recommendations.)
- For EdDSA, the only valid sizes are 255 bits (these keys are also known as Ed25519 and are commonly used) and 448 bits (Ed448, which is much less common at the time of writing). (256 is also accepted for backward compatibility, but the effect is the same as 255.)
Selecting the Prime Generation Method
(This is entirely optional. Unless you know better, it’s entirely sensible to skip this and use the default settings.)
On the Key menu, you can also optionally change the method for generating the prime numbers used in the generated key. This is used for RSA and DSA keys only. (The other key types don’t require generating prime numbers at all.)
The prime-generation method does not affect compatibility: a key generated with any of these methods will still work with all the same SSH servers.
The available methods are:
- Use probable primes (fast)
- Use proven primes (slower)
- Use proven primes with even distribution (slowest)
The probable primes method sounds unsafe, but it’s the most commonly used prime-generation strategy. There is in theory a possibility that it might accidentally generate a number that isn’t prime, but the software does enough checking to make that probability vanishingly small (less than 1 in 2^80, or 1 in 10^24). So, in practice, nobody worries about it very much.
Advertisement
The other methods cause PuTTYgen to use numbers that it is sure are prime, because it generates the output number together with a proof of its primality. This takes more effort, but it eliminates that theoretical risk in the probabilistic method.
There in one way in which PuTTYgen’s proven primes method is not strictly better than its probable primes method. If you use PuTTYgen to generate an RSA key on a computer that is potentially susceptible to timing- or cache-based side-channel attacks, such as a shared computer, the probable primes method is designed to resist such attacks, whereas the proven primes methods are not. (This is only a concern for RSA keys; for other key types, primes are either not secret or not involved.)
You might choose to switch from probable to proven primes if you have a local security standard that demands it, or if you don’t trust the probabilistic argument for the safety of the usual method.
For RSA keys, there’s also an option on the Key menu to use ‘strong’ primes as the prime factors of the public key. A ‘strong’ prime is a prime number chosen to have a particular structure that makes certain factoring algorithms more difficult to apply, so some security standards recommend their use. However, the most modern factoring algorithms are unaffected, so this option is probably not worth turning on unless you have a local standard that recommends it.
The Key Fingerprint Box
The Key fingerprint box shows you a fingerprint value for the generated key. This is derived cryptographically from the public key value, so it doesn’t need to be kept secret; it is supposed to be more manageable for human beings than the public key itself.
The fingerprint value is intended to be cryptographically secure, in the sense that it is computationally infeasible for someone to invent a second key with the same fingerprint, or to find a key with a particular fingerprint. So some utilities, such as the Pageant key list box and the Unix ssh-add utility, will list key fingerprints rather than the whole public key.
By default, PuTTYgen will display fingerprints in the SHA-256 format. If you need to see the fingerprint in the older MD5 format (which looks like aa:bb:cc:…), you can choose Show fingerprint as MD5 from the Key menu, but bear in mind that this is less cryptographically secure; it may be feasible for an attacker to create a key with the same fingerprint as yours.
Advertisement
Setting a Comment for Your Key
If you have more than one key and use them for different purposes, you don’t need to memorize the key fingerprints in order to tell them apart. PuTTYgen allows you to enter a comment for your key, which will be displayed whenever WinSCP or an authentication agent (such as Pageant) asks you for the passphrase.
The default comment format, if you don’t specify one, contains the key type and the date of generation, such as rsa-key-20011212. Another commonly used approach is to use your name and the name of the computer the key will be used on, such as simon@simons-pc.
To alter the key comment, just type your comment text into the Key comment box before saving the private key. If you want to change the comment later, you can load the private key back into PuTTYgen, change the comment, and save it again.
Setting a Passphrase for Your Key
The Key passphrase and Confirm passphrase boxes allow you to choose a passphrase for your key. The passphrase will be used to encrypt the key on disk, so you will not be able to use the key without first entering the passphrase.
When you save the key, PuTTYgen will check that the Key passphrase and Confirm passphrase boxes both contain exactly the same passphrase, and will refuse to save the key otherwise.
If you leave the passphrase fields blank, the key will be saved unencrypted. You should not do this without good reason; if you do, your private key file on disk will be all an attacker needs to gain access to any machine configured to accept that key. If you want to be able to passwordless log in without having to type a passphrase every time, you should consider using an authentication agent (such as Pageant) so that your decrypted key is only held in memory rather than on disk.
Under special circumstances you may genuinely need to use a key with no passphrase; for example, if you need to run an automated batch script that needs to make an SSH connection, you can’t be there to type the passphrase. In this case we recommend you generate a special key for each specific batch script (or whatever) that needs one, and on the server side you should arrange that each key is restricted so that it can only be used for that specific purpose. The documentation for your SSH server should explain how to do this (it will probably vary between servers).
Choosing a good passphrase is difficult. Just as you shouldn’t use a dictionary word as a password because it’s easy for an attacker to run through a whole dictionary, you should not use a song lyric, quotation or other well-known sentence as a passphrase. If you want your passphrase to make grammatical sense, this cuts down the possibilities a lot and you should use a longer one as a result.
Do not forget your passphrase. There is no way to recover it.
Adding a Certificate to Your Key
In some environments, user authentication keys can be signed in turn by a certifying authority (CA for short), and user accounts on an SSH server can be configured to automatically trust any key that’s certified by the right signature.
This can be a convenient setup if you have a very large number of servers. When you change your key pair, you might otherwise have to edit the authorized_keys file (in case of OpenSSH) on every server individually, to make them all accept the new key. But if instead you configure all those servers once to accept keys signed as yours by a CA, then when you change your public key, all you have to do is to get the new key certified by the same CA as before, and then all your servers will automatically accept it without needing individual reconfiguration.
Advertisement
To get your key signed by a CA, you’ll probably send the CA the new public key (not the private half), and get back a modified version of the public key with the certificate included.
If you want to incorporate the certificate into your PPK file for convenience, you can use the Add certificate to key menu option in PuTTYgen’s Key menu. This will give you a single file containing your private key and the certificate, which is everything you need to authenticate to a server prepared to accept that certificate.
To remove the certificate again and restore the uncertified PPK file, there’s also a Remove certificate from key option.
(However, you don’t have to incorporate the certificate into your PPK file. You can equally well use it separately, via the Certificate to use with the private key option in WinSCP itself. It’s up to you which you find more convenient.)
When the currently loaded key in PuTTYgen contains a certificate, the large Public key for pasting edit box is replaced by a button that brings up an information box telling you about the certificate, such as who it certifies your key as belonging to, when it expires (if ever), and the fingerprint of the CA key that signed it in turn.
Saving Your Private Key to a Disk File
Once you have generated a key, set a comment field and set a passphrase, you are ready to save your private key to disk.
Press the Save private key button. PuTTYgen will put up a dialog box asking you where to save the file. Select a directory, type in a file name, and press Save.
This file is in PuTTY’s native format (*.PPK); it is the one you will need to tell WinSCP to use for authentication.
(You can optionally change some details of the PPK format for your saved key files. But the defaults should be fine for most purposes.)
If you have started PuTTYgen from SSH > Authentication page of Advanced Site Settings dialog, WinSCP automatically detects the saved key and will insert its path it into Private key file box.
Saving Your Public Key to a Disk File
RFC 4716 specifies a standard format for storing SSH public keys on disk. Some SSH servers (such as ssh.com’s) require a public key in this format in order to accept authentication with the corresponding private key. (Others, such as OpenSSH, use a different format)
To save your public key in the SSH standard format, press the Save public key button in PuTTYgen. PuTTYgen will put up a dialog box asking you where to save the file. Select a directory, type in a file name, and press Save.
You will then probably want to copy the public key file to your SSH server machine.
Parameters for Saving Key Files
Selecting Parameters for saving key files from the Key menu lets you adjust some aspects of PPK-format private key files stored on disk. None of these options affect compatibility with SSH servers.
In most cases, it’s entirely sensible to leave all of these at their default settings.
PPK File Version
This defaults to version 3, which is fine for most uses.
You might need to select PPK version 2 if you need your private key file to be loadable in older versions of WinSCP or PuTTY, or in other tools which do not yet support the version 3 format (which was introduced in 2021).
The version 2 format is less resistant to brute-force decryption, and doesn’t support any of the following options to control that.
Options Affecting Passphrase Hashing
All of the following options only affect keys saved with passphrases. They control how much work is required to decrypt the key (which happens every time you type its passphrase). This allows you to trade off the cost of legitimate use of the key against the resistance of the encrypted key to password-guessing attacks.
These options only affect PPK version 3.
- Key derivation function: The variant of the Argon2 key derivation function to use. You might change this if you consider your exposure to side-channel attacks to be different to the norm.
- Memory to use for passphrase hash: The amount of memory needed to decrypt the key, in Kbyte.
- Time to use for passphrase hash: Controls how much time is required to attempt decrypting the key. You can either specify an approximate time in milliseconds (on this machine), or explicitly specify a number of hash passes (which is what the time is turned into during encryption).
- Parallelism for passphrase hash: Number of parallelisable threads that can be used to decrypt the key. The default, 1, forces the process to run single-threaded, even on machines with multiple cores.
Reloading a Private Key
PuTTYgen allows you to load an existing private key file into memory. If you do this, you can then change the passphrase and comment before saving it again; you can also make extra copies of the public key.
To load an existing key, press the Load button. PuTTYgen will display a dialog box where you can browse around the file system and find your key file. Once you select the file, PuTTYgen will ask you for a passphrase (if necessary) and will then display the key details in the same way as if it had just generated the key.
If you use the Load command to load a foreign key format, it will work, but you will see a message box warning you that the key you have loaded is not a PuTTY native key. See below for information about importing foreign key formats.
Advertisement
Dealing with Private Keys in Other Formats
SSH private keys have no standard format. OpenSSH and ssh.com have different formats, and WinSCP’s is different again. So a key generated with one client cannot immediately be used with another.
Using the Import command from the Conversions menu, PuTTYgen can load SSH private keys in OpenSSH’s format and ssh.com’s format. Once you have loaded one of these key types, you can then save it back out as a PuTTY-format key (*.PPK) so that you can use it with the WinSCP. The passphrase will be unchanged by this process (unless you deliberately change it). You may want to change the key comment before you save the key, since some OpenSSH key formats contained no space for a comment, and ssh.com’s default comment format is long and verbose.
PuTTYgen can also export private keys in OpenSSH format and in ssh.com format. To do so, select one of the Export options from the Conversions menu. Exporting a key works exactly like saving it – you need to have typed your passphrase in beforehand, and you will be warned if you are about to save a key without a passphrase.
For OpenSSH there are two options. Modern OpenSSH actually has two formats it uses for storing private keys: an older (“PEM-style”) format, and a newer “native” format with better resistance to passphrase guessing and support for comments. Export OpenSSH key will automatically choose the oldest format supported for the key type, for maximum backward compatibility with older versions of OpenSSH; for newer key types like Ed25519, it will use the newer format as that is the only legal option. If you have some specific reason for wanting to use OpenSSH’s newer format even for RSA, DSA, or ECDSA keys – for instance, you know your file will only be used by OpenSSH 6.5 or newer (released in 2014), and want the extra security – you can choose Export OpenSSH key (force new file format).
You can also use WinSCP /keygen command-line switch to convert the private key from other formats.
PuTTYgen Command-line Configuration
PuTTYgen supports a set of command-line options to configure many of the same settings you can select in the GUI. This allows you to start it up with your own preferences ready-selected, which might be useful if you generate a lot of keys. (For example, you could make a Windows shortcut that runs PuTTYgen with some command line options, or a batch file or Powershell script that you could distribute to a whole organisation containing your local standards.)
Note that WinSCP has /keygen command-line switch that can be used to convert the private keys automatically.
The options supported on the PuTTYgen command line are:
-t <keytype> |
Type of key to generate. You can select rsa, dsa, ecdsa, eddsa, ed25519 or ed448 |
-b <bits> |
Size of the key to generate, in bits. |
--primes <method> |
Method for generating prime numbers. You can select probable, proven, and proven-even. |
--strong-rsa |
When generating an RSA key, make sure the prime factors of the key modulus are strong primes. |
--ppk-param <key>=<value> |
Allows setting details of the PPK save file format. Aspects to change are specified as a series of <key>=<value> pairs separated by commas. The keys are: version – The PPK format version: either 3 or 2. kdf – The variant of Argon2 to use: argon2id, argon2i, and argon2d. memory – The amount of memory needed to decrypt the key, in Kbyte. time – Specifies how much time is required to attempt decrypting the key, in milliseconds. passes – Alternative to time: specifies the number of hash passes required to attempt decrypting the key. parallelism – Number of parallelisable threads that can be used to decrypt the key. |
-E <fptype> |
Algorithm to use when displaying key fingerprints. You can select sha256 or md5. |
Advertisement
- The text is copy of PuTTY User Manual or was inspired by it.Back